
 My Inquiry
 My Account


Jumper Cables: How to Use, Connect and Choose Them Safely
Article Details
Jumper cables, also called booster cables, are heavy-duty insulated cables used to connect a weak vehicle battery to a charged battery or jump-start source. They are designed to carry high starting current for a short time, not to operate as general electrical wires or low-current test leads.
A safe jump start depends on three things: correct connection order, a battery that is safe to boost, and cables that can carry enough current without excessive voltage drop or heating. Cable gauge, cable length, clamp quality, battery terminal condition and vehicle electrical system type all affect the result.
What Are Jumper Cables?
Jumper cables are a pair of insulated high-current cables with clamps on both ends. The red cable connects positive terminals or positive jump posts. The black cable completes the negative side of the circuit, usually through the booster battery negative terminal and a grounded metal point on the disabled vehicle.
The cable must handle a short burst of high current during cranking. If the cable is too thin, too long, poorly crimped or fitted with weak clamps, the starter motor may not receive enough voltage. The cable can also heat up at high current, especially if the clamps make poor contact with corroded battery terminals.
| Part | Purpose | What to Check |
|---|---|---|
| Red cable | Connects the positive side of the donor and discharged battery system. | Insulation condition, clamp grip and correct polarity. |
| Black cable | Completes the return path through negative terminal and chassis/engine ground. | Final ground point, contact surface and distance from battery fumes. |
| Clamps | Attach the cable to battery posts, jump posts or ground points. | Spring force, copper contact area, jaw shape and insulation. |
| Cable conductor | Carries starter current during jump starting. | Gauge, material, length, flexibility and temperature rating. |
| Insulation | Prevents accidental short circuits and protects the conductor. | Cracks, stiffness in cold weather, burn marks and exposed wire. |
Before You Use Jumper Cables
Do not connect jumper cables until the battery and vehicle are safe to work on. A cracked, leaking, frozen, swollen or heavily damaged battery should not be jump-started. If the battery has a strong sulfur smell, visible acid leakage, severe corrosion or signs of overheating, use roadside service or a qualified technician instead.
The vehicles should not touch each other. Both vehicles should be parked securely, with ignition off before connection unless the vehicle manual gives a different procedure. Keep metal tools, jewelry and loose cable clamps away from battery terminals.
| Pre-Check | Safe Condition | Unsafe Condition |
|---|---|---|
| Battery case | Clean, intact and not swollen. | Cracked, leaking, frozen or bulging battery. |
| Battery voltage system | Both vehicles use compatible 12 V systems. | Mixing 12 V and 24 V systems or uncertain system voltage. |
| Terminals | Visible positive and negative terminals or marked jump posts. | Unclear polarity, heavy corrosion or damaged posts. |
| Cable condition | Insulation intact, clamps firm, no exposed conductor. | Cracked insulation, loose clamp, melted cable or damaged crimp. |
| Vehicle type | Procedure confirmed in owner's manual. | Hybrid or EV jump points used without checking manual guidance. |
How to Use Jumper Cables Safely
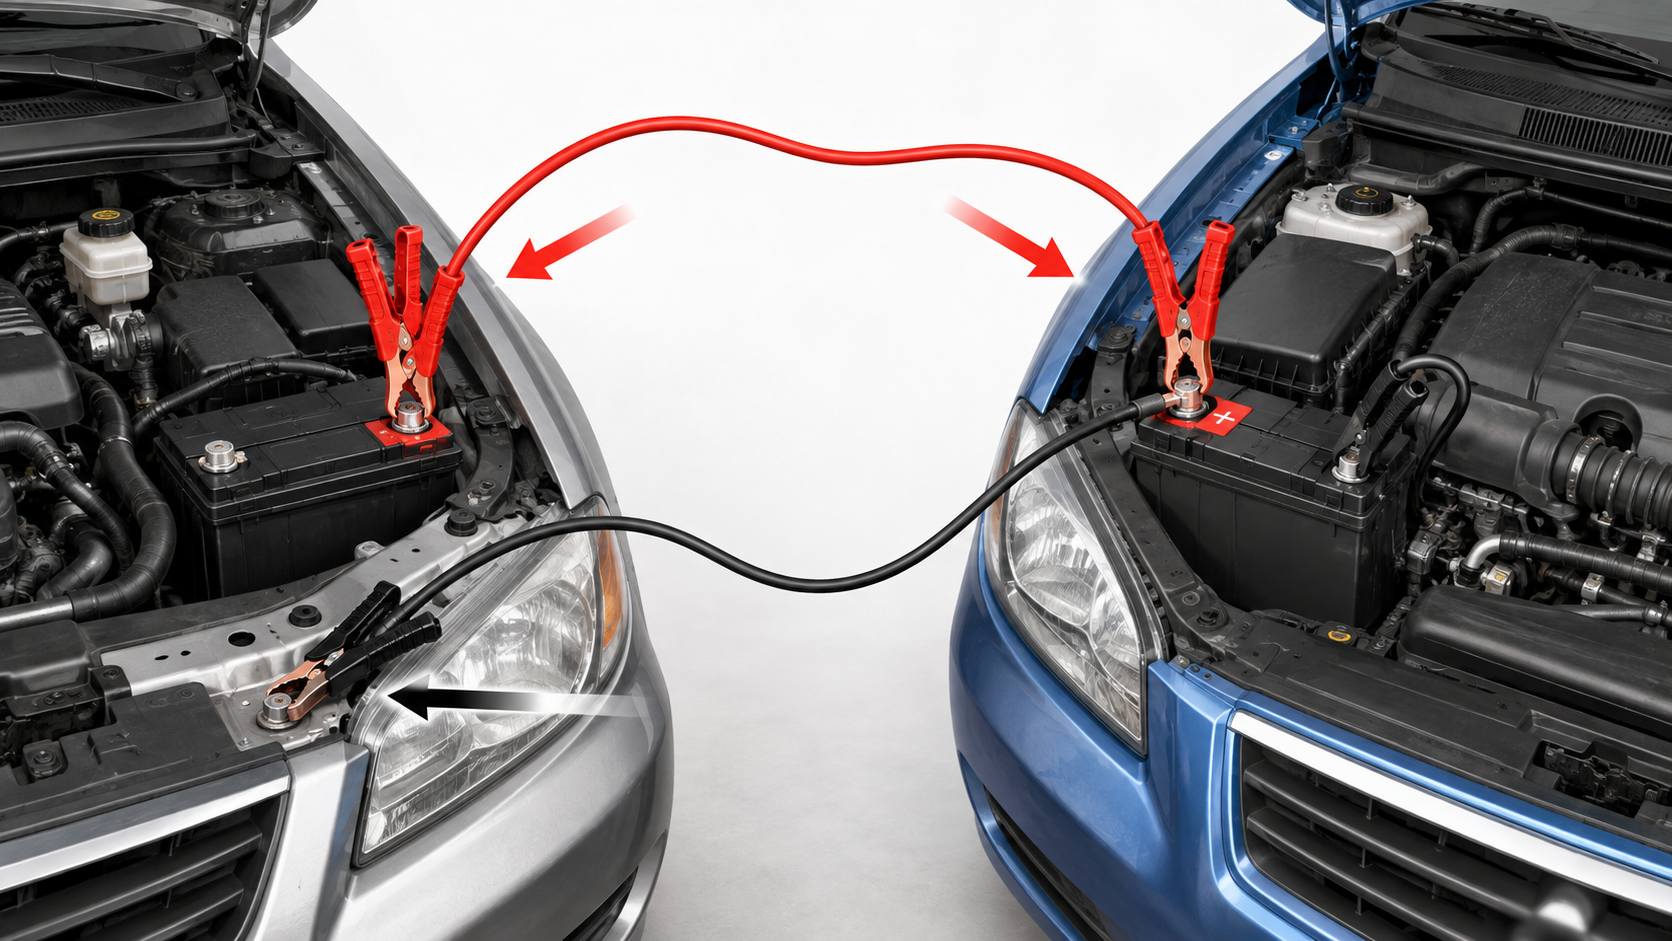
The standard connection sequence is positive first, then negative, with the final negative connection made to a suitable ground point on the disabled vehicle. AAA and Honda both describe this general connection pattern, and Honda specifically warns not to connect the final booster cable to the disabled battery negative terminal in its procedure. (AAA jumper cable guide) (Honda booster cable connection guidance)
- Park both vehicles close enough for the cables to reach, but do not let the vehicles touch.
- Turn off both vehicles and electrical loads such as lights, heater blower and audio system.
- Confirm both systems are compatible 12 V vehicles unless the owner's manual gives another approved method.
- Connect one red clamp to the positive terminal or positive jump post of the discharged vehicle.
- Connect the other red clamp to the positive terminal or positive jump post of the booster battery.
- Connect one black clamp to the negative terminal or negative jump post of the booster battery.
- Connect the final black clamp to a clean, solid metal ground point on the disabled vehicle, away from the battery, fuel lines and moving parts.
- Start the booster vehicle and let it run briefly.
- Try starting the disabled vehicle. Do not crank for long periods.
- After the disabled vehicle starts, remove the cables in the reverse order.
Jumper Cable Connection Order
Connection order matters because a wrong connection can create sparks, short circuits, battery damage or vehicle electronics damage. The positive clamps are connected first. The final connection is the most likely point for a small spark, so it is usually made at a ground point away from the discharged battery.
| Step | Clamp | Connection Point | Purpose |
|---|---|---|---|
| 1 | Red clamp | Positive terminal or jump post on the discharged vehicle. | Connects the disabled vehicle positive side first. |
| 2 | Red clamp | Positive terminal or jump post on the booster battery. | Connects the donor battery positive side. |
| 3 | Black clamp | Negative terminal or negative jump post on the booster battery. | Connects the return side from the donor vehicle. |
| 4 | Black clamp | Clean engine block, chassis ground or marked ground point on the disabled vehicle. | Completes the circuit away from the discharged battery. |
Why the Last Black Clamp Goes to Ground
Lead-acid batteries can release flammable gas, especially during charging or heavy current flow. The last clamp connection may create a spark. Placing the final black clamp on a clean metal ground point away from the battery reduces the chance of a spark occurring directly at the battery vent area.
The ground point must be solid metal connected to the engine block or chassis ground. Do not clamp to painted metal, plastic, fuel lines, thin brackets, moving pulleys, fans or belts. Many modern cars have marked jump-start ground points under the hood. Use those points when the vehicle manual provides them.
How to Remove Jumper Cables
Remove jumper cables in the reverse order of connection. Keep the clamps from touching each other or any unintended metal surface during removal.
| Removal Step | Remove From | Reason |
|---|---|---|
| 1 | Ground point on the vehicle that was disabled. | Breaks the final return connection first. |
| 2 | Negative terminal or ground point on the booster vehicle. | Removes the negative cable completely. |
| 3 | Positive terminal on the booster vehicle. | Starts removing the positive cable after negative is disconnected. |
| 4 | Positive terminal on the vehicle that was disabled. | Removes the final cable connection. |
Jumper Cable Gauge and Length
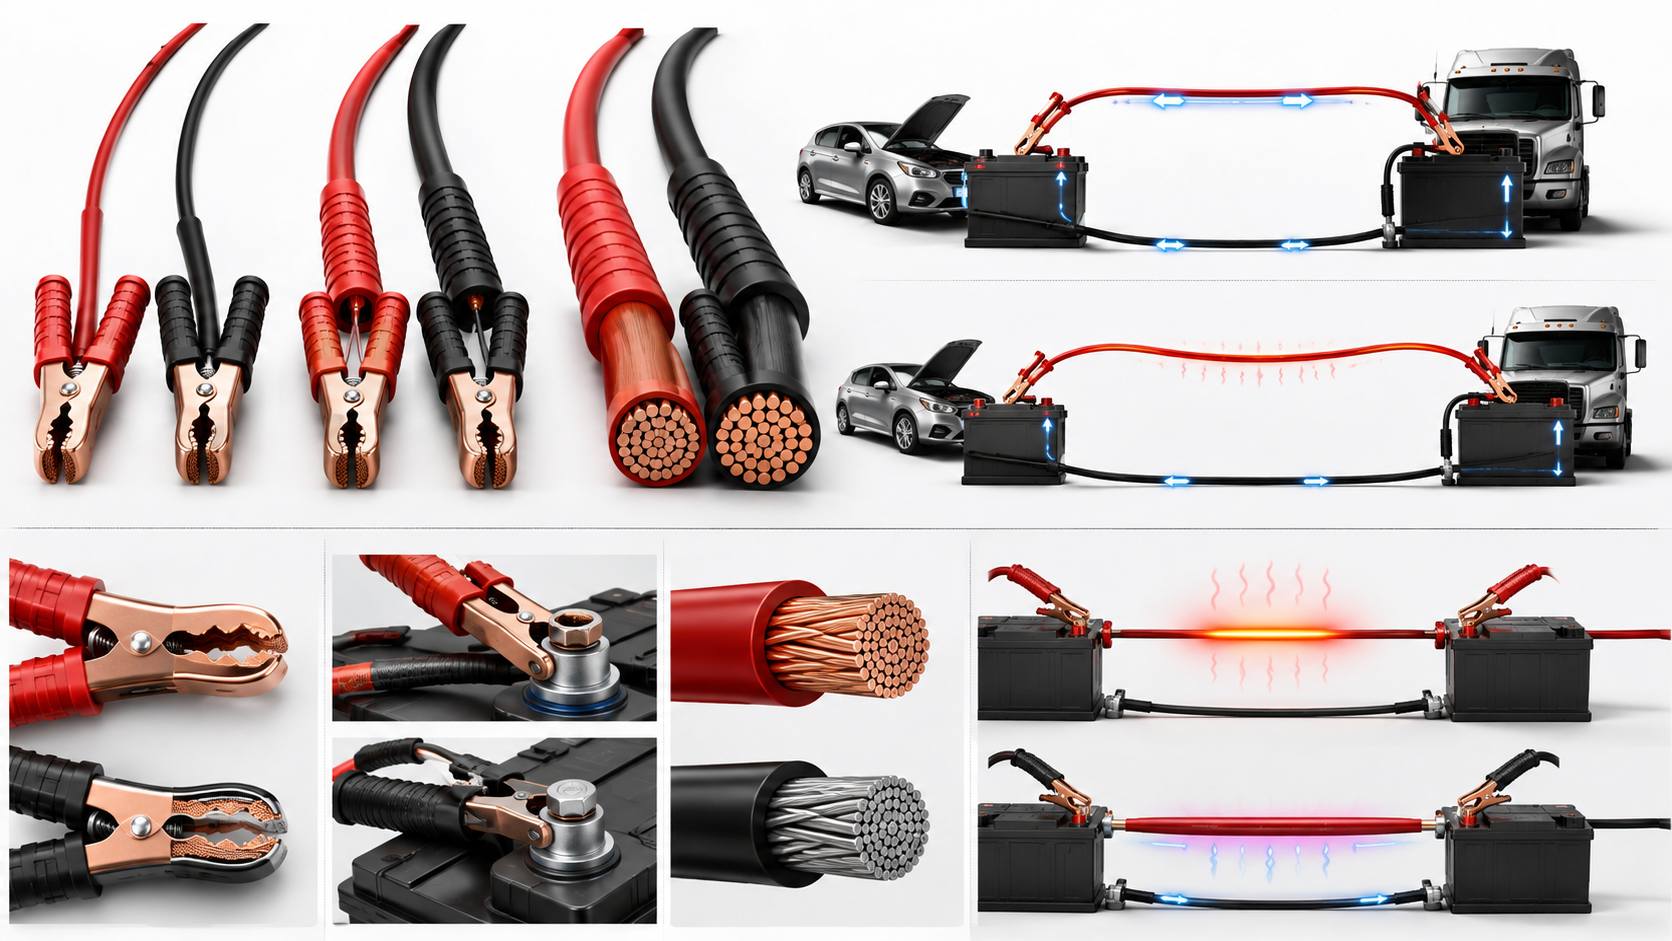
Jumper cable gauge controls conductor resistance. A lower AWG number means a thicker conductor. Thicker cables can carry more current with less voltage drop and less heat. Cable length also matters. A long cable is convenient, but longer cable has more resistance. For the same conductor material, a long thin cable will perform worse than a shorter thick cable.
Small gasoline cars may start with lighter cables if the battery is only slightly weak. Large engines, trucks, diesel vehicles and cold-weather starts need heavier cables. Cheap cables with thick-looking insulation can hide thin conductors, so gauge and conductor material matter more than outside diameter.
| Cable Gauge | Typical Use | Design / Buying Note |
|---|---|---|
| 8 AWG | Light-duty use for small vehicles in mild conditions. | Can struggle with larger engines, long cable runs or weak contact points. |
| 6 AWG | General use for many passenger cars. | Better balance between cost, flexibility and current capability. |
| 4 AWG | SUVs, trucks, larger engines and colder climates. | Lower voltage drop and better starting support. |
| 2 AWG or heavier | Commercial, fleet, diesel and roadside-service use. | Heavier, more expensive, but better for repeated high-current service. |
Copper vs CCA Jumper Cables
Jumper cables may use pure copper conductors or copper-clad aluminum conductors. Copper has lower resistance and better conductivity. Copper-clad aluminum can be lighter and cheaper, but it generally needs a larger conductor size to approach similar current performance.
For emergency use, CCA cables can work if they are sized properly and used within their limits. For repeated service, cold weather, larger vehicles or commercial use, heavy-gauge copper cables are usually the better choice.
| Conductor Type | Advantage | Trade-Off |
|---|---|---|
| Copper | Lower resistance, better current delivery, better durability for heavy use. | Higher cost and heavier cable. |
| Copper-clad aluminum | Lower cost and lighter weight. | Higher resistance than copper; may need heavier gauge for similar performance. |
Jumper Cable Clamps
Clamp quality can decide whether a jump start works. A thick cable with weak clamps can still fail because current must pass through the actual contact points between clamp jaws and battery posts or jump terminals.
Good clamps have strong spring pressure, broad metal contact area, durable insulation and jaws that can grip both side-post and top-post terminals. Poor clamps may twist, slip, arc or heat up under load. Corrosion on the battery terminal also increases resistance, so a clean contact area is important.
| Clamp Feature | Why It Matters |
|---|---|
| Strong spring force | Keeps the clamp stable during cranking vibration. |
| Wide conductive jaw area | Reduces contact resistance and heating. |
| Insulated handles | Reduces accidental contact with terminals or body metal. |
| Flexible jaw geometry | Helps grip different terminal shapes and jump posts. |
| Good cable-to-clamp crimp | Prevents hidden resistance at the cable termination. |
Jumper Cables vs Portable Jump Starter
Jumper cables need a second vehicle or another suitable 12 V source. A portable jump starter contains its own battery pack and clamp leads. A jump starter can be easier in a parking lot or roadside situation, but it must be charged and rated for the vehicle.
| Item | Jumper Cables | Portable Jump Starter |
|---|---|---|
| Second vehicle needed | Yes. | No. |
| Maintenance | Inspect cables and clamps. | Keep internal battery charged and check manufacturer limits. |
| Safety features | Usually basic; user must avoid reverse polarity and shorts. | Many units include reverse-polarity, short-circuit and low-voltage protection. |
| Current delivery | Depends on donor vehicle, cable gauge, length and clamp contact. | Depends on jump starter battery condition and peak/starting current rating. |
| Best use | Simple emergency kit when another vehicle is available. | Solo use, fleet kit, roadside kit or vehicles parked where another car cannot reach. |
Hybrid and Electric Vehicle Jump Starting
Hybrid and electric vehicles may still have a 12 V battery, but their jump-starting procedure can differ from a conventional vehicle. NHTSA advises EV owners to refer to the owner's manual for jump-starting procedures and battery location. (NHTSA electric and hybrid vehicle safety FAQ)
Do not assume an EV or hybrid can be used to jump-start another vehicle. Some manufacturer manuals restrict the use of EV jump points for boosting another vehicle. Use only the approved jump terminals and procedure for the specific model.
Common Jumper Cable Mistakes
Most jumper cable failures come from poor contact, wrong order, wrong ground point, weak cable selection or trying to jump a battery that should not be boosted. Modern vehicles also contain sensitive electronic modules, so reverse polarity and voltage spikes can become expensive failures.
| Mistake | Risk | Better Practice |
|---|---|---|
| Connecting red to negative or black to positive | Reverse polarity, sparks, battery damage or module damage. | Identify positive and negative markings before touching the clamps. |
| Letting clamps touch each other | Direct short circuit. | Keep free clamps separated and controlled during connection and removal. |
| Final black clamp placed on the dead battery negative terminal | Spark may occur close to battery gas. | Use a clean engine or chassis ground point unless the manual says otherwise. |
| Using damaged cables | Heating, arcing, poor current flow or shock/burn risk. | Replace cables with cracked insulation, loose clamps or exposed wire. |
| Repeated long cranking attempts | Starter overheating, cable heating and battery stress. | Use short attempts and stop if the vehicle does not respond. |
| Jump-starting a damaged battery | Battery rupture, acid leakage or explosion risk. | Do not boost cracked, leaking, frozen or swollen batteries. |
| Ignoring vehicle manual jump posts | Wrong connection point or module damage. | Use manufacturer-specified jump posts when provided. |
How to Choose Jumper Cables
Good jumper cables should match the vehicle size, climate and expected use. For a small emergency kit, moderate-gauge cables may be enough. For trucks, diesel engines, fleet service or cold climates, heavier cables with strong clamps are a better choice.
| Selection Item | What to Look For |
|---|---|
| Cable gauge | Lower AWG number for larger vehicles, cold weather and repeated use. |
| Cable length | Long enough to reach between vehicles, but not unnecessarily long for the gauge. |
| Conductor material | Copper for lower resistance and heavy-duty use; CCA only if properly sized. |
| Clamp quality | Strong spring force, good jaw shape and broad conductive contact area. |
| Insulation | Flexible in cold weather, thick enough for abrasion resistance, no cracking. |
| Vehicle class | Small car, SUV, truck, diesel and fleet vehicles need different current capability. |
| Storage | Bag or case that keeps clamps separated and insulation protected. |
What to Do After a Jump Start
A successful jump start does not prove the battery is healthy. The battery may be discharged because of an old battery, weak alternator, parasitic drain, loose terminal, cold weather or a device left on. After the vehicle starts, drive or idle according to the vehicle manual and have the battery and charging system tested if the problem returns.
If the vehicle immediately dies after removing the cables, the charging system or battery may not be supporting the electrical load. If the vehicle cranks slowly again after a short stop, the battery may not be holding charge.
Frequently Asked Questions
What are jumper cables?
Jumper cables are heavy-duty insulated cables with clamps used to connect a weak vehicle battery to a charged battery or jump-start source for emergency starting.
How do you use jumper cables?
Connect red to the discharged battery positive terminal, red to the booster battery positive terminal, black to the booster battery negative terminal, and the final black clamp to a clean ground point on the disabled vehicle.
How do you connect jumper cables?
The usual order is positive on dead vehicle, positive on donor vehicle, negative on donor vehicle, then ground on the disabled vehicle. Remove the cables in reverse order.
Which jumper cable goes on first?
The first connection is usually the red positive clamp on the positive terminal or positive jump post of the vehicle with the discharged battery.
Why not connect the last black clamp to the dead battery?
The final connection can spark. Placing it on a clean metal ground point away from the battery reduces spark risk near battery gas.
What gauge jumper cables do I need?
Many passenger cars can use 6 AWG or 4 AWG cables. Larger engines, trucks, diesel vehicles and cold-weather use usually need heavier cables with lower AWG numbers.
Are longer jumper cables better?
Longer cables are easier to position, but they add resistance. If you need long cables, choose a heavier gauge to reduce voltage drop and heating.
Can jumper cables damage a car?
Yes. Reverse polarity, shorted clamps, poor ground points, wrong voltage systems or incorrect vehicle procedures can damage batteries and electronic modules.
What is the difference between jumper cables and booster cables?
In automotive use, jumper cables and booster cables usually mean the same thing: high-current cables used to help start a vehicle with a weak battery.
Can I use jumper cables on a hybrid or EV?
Check the owner's manual first. Hybrid and electric vehicles may have special 12 V jump-start points and restrictions, and some should not be used to jump-start another vehicle.
What happens if jumper cables are connected backwards?
Reverse connection can cause sparks, blown fuses, battery damage, alternator damage or electronic module failure. Disconnect immediately if a wrong connection is suspected.
How long should jumper cables stay connected?
Keep them connected only long enough to attempt a safe start and stabilize briefly. Do not use jumper cables as a long-term battery charger.
Practical Summary
Jumper cables are simple tools, but they carry high current and are used around batteries that can produce sparks, gas and acid. Safe use depends on correct polarity, correct connection order, a safe ground point, undamaged cables and a battery that is suitable to boost.
For selection, cable gauge, length, conductor material and clamp quality matter more than package claims. For modern vehicles, the owner's manual remains the final reference because jump posts, battery locations, hybrid systems and electronic protection rules vary by model.


